
API Details:
PrestaShop provides a powerful CRUD-based Web Service API that allows third-party tools and applications to securely access and manage store data. Built on REST architecture, the API is designed for maximum compatibility across platforms by utilizing standard HTTP methods along with XML or JSON data formats. This ensures seamless integration with a wide range of systems, enabling developers to perform operations such as creating, reading, updating, and deleting resources within the PrestaShop database efficiently.
Get Prestashop order details:
In this step, we’ll use cURL requests with PrestaShop API endpoints to fetch order-related data, including order details, customer information, and customer addresses. This allows us to collect all necessary order data for exporting to a WooCommerce store. With this integration, real-time synchronization can be achieved—ensuring that as soon as an order is received in PrestaShop, it’s automatically exported and created in the connected WooCommerce store.
API Endpoints:
- Get Orders
- Get Customer Details
- Get Customer addresses
1- Get Orders:
Curl request-1: Get Prestashop Order ID’s
In order to get prestashop api orders id’s we will use api endpoint “/api/orders” with some additional paramTo retrieve the list of order IDs from the PrestaShop API, we’ll use the /api/orders endpoint along with optional parameters such as date ranges and output format (XML or JSON). These filters help us fetch only the relevant orders—for example, orders placed within a specific timeframe—making the data extraction more efficient and suitable for syncing with external platforms like WooCommerce.
  // PrestaShop API endpoint (replace with your store's domain)
  $prestashop_url = 'https://www.examplesite.com';

  // Your PrestaShop API key
  $api_key = 'api key here';

  // Get today's date in the format PrestaShop uses
  $start_date = "starting from date";   //2025-01-14
  $end_date = "ending date";            //2025-02-20

  // Prepare the URL for fetching orders created today
  $order_url = $prestashop_url . '/api/orders?filter[date_add]=[' .
  urlencode($start_date . ' 00:00:00') . ',' . urlencode($end_date . ' 23:59:59')
  .']&date=1&output_format=JSON';

  // cURL setup for fetching order IDs
  $ch = curl_init();
  curl_setopt($ch, CURLOPT_URL, $order_url);      // URL to the orders endpoint
  curl_setopt($ch, CURLOPT_RETURNTRANSFER, true); // Return the response as a string
  curl_setopt($ch, CURLOPT_HTTPHEADER, array(
   'Authorization: Basic ' . base64_encode($api_key . ':')
  ));
  $httpcode = curl_getinfo($ch, CURLINFO_HTTP_CODE);
  // Execute the cURL request
  $response = curl_exec($ch);

  // Check for errors
  if (curl_errno($ch)) {
    echo 'Curl error: ' . curl_error($ch);
    exit;
  }
  // Close the cURL session
  curl_close($ch);
Curl request-2: Get Prestashop Order Details
To fetch detailed order information from the PrestaShop API, we’ll use the /api/orders endpoint with additional parameters, such as the desired output format (e.g., JSON or XML). This request returns complete order data including product details, quantities, payment status, and more—essential for exporting or syncing with platforms like WooCommerce.
  // PrestaShop API endpoint (replace with your store's domain)
  $prestashop_url = 'https://www.examplesite.com';

  // Your PrestaShop API key
  $api_key = 'api key here';

  $order_detail_url = $prestashop_url . "/api/orders/$order_id?output_format=JSON";

  // Fetch detailed order information
  $ch = curl_init();
  curl_setopt($ch, CURLOPT_URL, $order_detail_url);
  curl_setopt($ch, CURLOPT_RETURNTRANSFER, true);
  curl_setopt($ch, CURLOPT_HTTPHEADER, array(
    'Authorization: Basic ' . base64_encode($api_key . ':')
  ));
  $order_response = curl_exec($ch);
  if (curl_errno($ch)) {
    echo 'Curl error: ' . curl_error($ch);
    exit;
  }
  curl_close($ch);
2- Get Customer Details: Get Prestashop Customers
To retrieve customer details from PrestaShop, we use the /api/customers/ endpoint along with the specific customer ID obtained from the previous order details request. This allows us to access customer-related information such as name, email, and registration date—data that’s essential for accurately syncing orders and customer records with the WooCommerce store.
  // PrestaShop API endpoint (replace with your store's domain)
  $prestashop_url = 'https://www.examplesite.com';

  // Your PrestaShop API key
  $api_key = 'api key here';

  $order_detail_url = $prestashop_url . "/api/customers/$cust_id?
  output_format=JSON";
  // Fetch detailed order information
  $ch = curl_init();
  curl_setopt($ch, CURLOPT_URL, $order_detail_url);
  curl_setopt($ch, CURLOPT_RETURNTRANSFER, true);
  curl_setopt($ch, CURLOPT_HTTPHEADER, array(
    'Authorization: Basic ' . base64_encode($api_key . ':')
  ));

  $order_response = curl_exec($ch);
  if (curl_errno($ch)) {
     echo 'Curl error: ' . curl_error($ch);
     exit;
  }
  curl_close($ch);
3- Get Prestashop Customer addresses
To obtain the customer’s billing and shipping addresses, we’ll use the /api/addresses endpoint. By passing the customer ID or address ID (retrieved from the order or customer data), we can fetch complete address details including street, city, postcode, country, and more. This information is crucial for creating accurate order exports and ensuring proper fulfillment when syncing orders to the WooCommerce store.
  //PrestaShop API endpoint (replace with your store's domain)
  $prestashop_url = 'https://www.examplesite.com';

  //Your PrestaShop API key
  $api_key = 'api key here';

  $order_detail_url = $prestashop_url . "/api/addresses
  filter[id_customer]=$cust_id&display=full&output_format=JSON";

  //Fetch detailed order information
  $ch = curl_init();
  curl_setopt($ch, CURLOPT_URL, $order_detail_url);
  curl_setopt($ch, CURLOPT_RETURNTRANSFER, true);
  curl_setopt($ch, CURLOPT_HTTPHEADER, array(
     'Authorization: Basic ' . base64_encode($api_key . ':')
  ));

  $order_response = curl_exec($ch);

  if (curl_errno($ch)) {
     echo 'Curl error: ' . curl_error($ch);
     exit;
  }
  curl_close($ch);
Create Woocommerce order:
After retrieving all necessary data from PrestaShop using the API endpoints, we proceed to create orders in WooCommerce using the native wc_create_order() function. This function returns a new WooCommerce order ID, which we then use to add order items, assign the customer using their ID, set billing and shipping addresses, apply order totals, and include any additional metadata required.
If you’re looking for a complete solution, we’ve developed a custom plugin that automates the import and synchronization of PrestaShop orders with your WooCommerce store. Feel free to contact us if you’d like to get the plugin or need help with a tailored integration setup.
API Details:
Malfini is a leading supplier of high-quality promotional clothing, serving over 35 countries across Europe through its well-known brands: MALFINI®, MALFINI Premium®, Piccolio®, and RIMECK®. The company aims to become the largest distributor of promotional apparel in Europe, offering a wide range of customizable clothing for various industries.
To support digital integrations and streamline B2B processes, Malfini provides a robust REST API that allows businesses to access product catalogs, inventory, pricing, and order functionality. You can explore more about their offerings at malfini.com and access the full API documentation here: api.malfini.com/api-docs.
API Endpoints:
1- api/v4/api-auth/login
2- api/v4/product
3- api/v4/product/availabilities
4- api/v4/product/prices
1- API Authentication with Token:
To begin using the Malfini API, the first step is authenticating your application by obtaining an access token. This is done by sending a POST request to the authentication endpoint: api/v4/api-auth/login. You’ll need to provide valid credentials (typically a username and password or API key) in the request body. Upon successful authentication, the API will return a bearer token, which must be included in the headers of all subsequent requests to authorize access to protected endpoints. This token-based approach ensures secure and authenticated communication with the API.
  $curl = curl_init();
  curl_setopt_array($curl, array(
  CURLOPT_URL => 'https://api.malfini.com/api/v4/api-auth/login',
  CURLOPT_RETURNTRANSFER => true,
  CURLOPT_ENCODING => '',
  CURLOPT_MAXREDIRS => 10,
  CURLOPT_TIMEOUT => 0,
  CURLOPT_FOLLOWLOCATION => true,
  CURLOPT_HTTP_VERSION => CURL_HTTP_VERSION_1_1,
  CURLOPT_CUSTOMREQUEST => 'POST',
  CURLOPT_POSTFIELDS =>'{
     "username": "{your api username}",
     "password": "{api password}"
  }',
  CURLOPT_HTTPHEADER => array('Content-Type: application/json')
  ));
  $response = curl_exec($curl);
  curl_close($curl);
2- API Endpoint: Get Products
To retrieve the list of available products from Malfini, you can use the api/v4/product endpoint. This endpoint returns detailed product data including product IDs, names, descriptions, categories, available colors, sizes, and other relevant attributes. It’s a key endpoint for syncing the Malfini product catalog with your own system or e-commerce store. Make sure to include the bearer token in the request header for proper authorization, as this endpoint requires authentication to access the product data.
  curl_setopt_array($curl, array(
  CURLOPT_URL => 'https://api.malfini.com/api/v4/product',
  CURLOPT_RETURNTRANSFER => true,
  CURLOPT_ENCODING => '',
  CURLOPT_MAXREDIRS => 10,
  CURLOPT_TIMEOUT => 0,
  CURLOPT_FOLLOWLOCATION => true,
  CURLOPT_HTTP_VERSION => CURL_HTTP_VERSION_1_1,
  CURLOPT_CUSTOMREQUEST => 'GET',
  CURLOPT_HTTPHEADER => array('Authorization: Bearer {token}),
  ));
  $response = curl_exec($curl);
  curl_close($curl);
3- API Endpoint: Get Stock/Inventory
To check current product availability, Malfini provides the api/v4/product/availabilities endpoint. This endpoint returns real-time stock information for all products, including available quantities per product variant (such as size and color). It’s essential for keeping your store or inventory management system up to date, ensuring that only in-stock items are displayed or offered to customers. As with other endpoints, authentication via a valid bearer token is required in the request header.
  $curl = curl_init();
  curl_setopt_array($curl, array(
  CURLOPT_URL => 'https://api.malfini.com/api/v4/product/availabilities',
  CURLOPT_RETURNTRANSFER => true,
  CURLOPT_ENCODING => '',
  CURLOPT_MAXREDIRS => 10,
  CURLOPT_TIMEOUT => 0,
  CURLOPT_FOLLOWLOCATION => true,
  CURLOPT_HTTP_VERSION => CURL_HTTP_VERSION_1_1,
  CURLOPT_CUSTOMREQUEST => 'GET',
  CURLOPT_HTTPHEADER => array('Authorization: Bearer {token}),
  ));
  $response = curl_exec($curl);
  $httpcode = curl_getinfo($curl, CURLINFO_HTTP_CODE);
  curl_close($curl);
4- API Endpoint: Get Prices
To retrieve pricing information for products, use the api/v4/product/prices endpoint. This endpoint provides up-to-date pricing details for all available products, including variant-specific prices where applicable. It supports personalized pricing based on customer groups or account-specific conditions, making it ideal for dynamic pricing integration. Ensure that your request includes the authorization token in the headers to successfully access the pricing data.
  $curl = curl_init();
  curl_setopt_array($curl, array(
  CURLOPT_URL => 'https://api.malfini.com/api/v4/product/prices',
  CURLOPT_RETURNTRANSFER => true,
  CURLOPT_ENCODING => '',
  CURLOPT_MAXREDIRS => 10,
  CURLOPT_TIMEOUT => 0,
  CURLOPT_FOLLOWLOCATION => true,
  CURLOPT_HTTP_VERSION => CURL_HTTP_VERSION_1_1,
  CURLOPT_CUSTOMREQUEST => 'GET',
  CURLOPT_HTTPHEADER => array('Authorization: Bearer {token}),
  ));
  $response = curl_exec($curl);
  $httpcode = curl_getinfo($curl, CURLINFO_HTTP_CODE);
  curl_close($curl);
The endpoints listed above are the core components required to integrate the Malfini API with a WooCommerce store—covering authentication, product data, inventory, and pricing. These allow for seamless synchronization between Malfini and your eCommerce platform. For more information or assistance with custom API integration into WooCommerce, feel free to contact us.
In this blog we will integrate 3 API suppliers to woocommerce store to import and real time sync products data.
Managing product data across multiple suppliers can be time-consuming and error-prone—especially when dealing with frequent stock updates, price changes, and large catalogs. In this post, we’ll cover how to integrate and import products from multiple supplier APIs—including Falk-Ross, UTTeam (UTT Europe), and Malfini—directly into your WooCommerce store. By connecting these supplier APIs, you can automate the process of syncing product details, inventory levels, and pricing in real time, ensuring your WooCommerce site is always up to date with accurate supplier data.
Supplier 1: Falk-Ross
Falk-Ross is one of the largest clothing manufacturers in Europe, offering a wide range of brands and products across the promotional and workwear sectors. Their API platform enables seamless integration with external systems like WooCommerce, allowing store owners to automate product import, pricing updates, and stock management.
You can browse their product range at: https://www.falk-ross.eu/en/Products.
To fetch product data from the Falk-Ross API, we will use a cURL request to access the designated API URL. This request will return structured product information including SKUs, product names, categories, sizes, colors, and more—ready to be mapped and imported into WooCommerce.
Curl Request:
  $curl = curl_init();
  curl_setopt_array($curl, array(
   CURLOPT_URL => "API URL endpoint here",
   CURLOPT_RETURNTRANSFER => true,
   CURLOPT_ENCODING => '',
   CURLOPT_MAXREDIRS => 10,
   CURLOPT_TIMEOUT => 0,
   CURLOPT_FOLLOWLOCATION => true,
   CURLOPT_HTTP_VERSION => CURL_HTTP_VERSION_1_1,
   CURLOPT_CUSTOMREQUEST => 'GET',
  ));
  $response = curl_exec($curl);
  curl_close($curl);
Supplier 2: Utteam.com
UTT Europe Kft. is a Hungarian-owned clothing distributor with a strong presence in Central Europe and the Balkans, specializing in promotional and workwear wholesale. Their product range includes a variety of garments suitable for branding, corporate use, and industrial purposes.
UTTeam offers a REST-based API that allows for direct access to product catalogs, stock availability, and pricing details—making it ideal for WooCommerce integration. The official site can be visited here: https://utteam.com.
To fetch data from UTTeam’s API, we will use structured cURL requests targeting endpoints like /api/dataexport?action=products, /action=stock, and /action=prices. These endpoints return JSON-formatted data which can be processed and mapped into WooCommerce product structures for automated imports and real-time updates.
Curl Request: Get Products
  $curl = curl_init();
  curl_setopt_array($curl, array(
  CURLOPT_URL => 'https://utteam.com/api/dataexport?{token here}/action=products&format=json',
  CURLOPT_RETURNTRANSFER => true,
  CURLOPT_ENCODING => '',
  CURLOPT_MAXREDIRS => 10,
  CURLOPT_TIMEOUT => 0,
  CURLOPT_FOLLOWLOCATION => true,
  CURLOPT_HTTP_VERSION => CURL_HTTP_VERSION_1_1,
  CURLOPT_CUSTOMREQUEST => 'GET',
  ));
  $response = curl_exec($curl);
  curl_close($curl);
Explanation: In the above curl request we will get the products and their data from the api by using api token in query parameters and some filters as well.
Curl Request: Get Stock/Inventory
  $curl = curl_init();
  curl_setopt_array($curl, array(
  CURLOPT_URL => 'https://utteam.com/api/dataexport/{api token}?
action=stock&format=json&variables=&fields=style%2Ccolor%2Csize%2Csku%2Cuttstock%2Cs
  uppstock%2Cprice%2Cspecialprice%2Cspecialstart%2Cspecialend%2Ccurrency%2Cuom',
  CURLOPT_RETURNTRANSFER => true,
  CURLOPT_ENCODING => '',
  CURLOPT_MAXREDIRS => 10,
  CURLOPT_TIMEOUT => 0,
  CURLOPT_FOLLOWLOCATION => true,
  CURLOPT_HTTP_VERSION => CURL_HTTP_VERSION_1_1,
  CURLOPT_CUSTOMREQUEST => 'GET',
  ));
  $response = curl_exec($curl);
  curl_close($curl);
Explanation: In the above curl request we can get the inventory/stock data from api that will be updated to our products we want to insert in our woocommerce store.
Curl Request: Get Prices Data
  $curl = curl_init();
  curl_setopt_array($curl, array(
  CURLOPT_URL => 'https://utteam.com/api/dataexport/{api token}?action=prices&format=json&variables=&fields=style%2Ccolor%2Csize%2Csku%2Cuttstock%2Csuppstock%2Cprice%2Cspecialprice%2Cspecialstart%2Cspecialend%2Ccurrency%2Cuom',
  CURLOPT_RETURNTRANSFER => true,
  CURLOPT_ENCODING => '',
  CURLOPT_MAXREDIRS => 10,
  CURLOPT_TIMEOUT => 0,
  CURLOPT_FOLLOWLOCATION => true,
  CURLOPT_HTTP_VERSION => CURL_HTTP_VERSION_1_1,
  CURLOPT_CUSTOMREQUEST => 'GET',
  ));
  $response = curl_exec($curl);
  curl_close($curl);
Explanation: In the above curl request we can get the price data from api that will be updated to our products we want to insert in our woocommerce store.
Supplier 3: Malfini.com
Malfini is one of the leading suppliers of promotional clothing in the Czech Republic and across Europe. With popular brands like MALFINI®, MALFINI Premium®, Piccolio®, and RIMECK®, the company supplies products to over 35 European countries. Malfini’s long-term goal is to become the largest distributor of promotional apparel in Europe.
You can explore their product offerings at: https://malfini.com/.
To integrate Malfini’s product data with WooCommerce, we utilize their REST API, which provides access to key endpoints for authentication, product listings, stock availability, and pricing. By sending secure cURL requests to endpoints such as /api/v4/product, /product/availabilities, and /product/prices, we can retrieve real-time data and automate product imports and updates into the WooCommerce platform.
Curl Request: Get API Token
  $curl = curl_init();
  curl_setopt_array($curl, array(
  CURLOPT_URL => 'https://api.malfini.com/api/v4/api-auth/login',
  CURLOPT_RETURNTRANSFER => true,
  CURLOPT_ENCODING => '',
  CURLOPT_MAXREDIRS => 10,
  CURLOPT_TIMEOUT => 0,
  CURLOPT_FOLLOWLOCATION => true,
  CURLOPT_HTTP_VERSION => CURL_HTTP_VERSION_1_1,
  CURLOPT_CUSTOMREQUEST => 'POST',
  CURLOPT_POSTFIELDS =>'{
     "username": "{your api username}",
     "password": "{api password}"
  }',
  CURLOPT_HTTPHEADER => array('Content-Type: application/json')
  ));
  $response = curl_exec($curl);
  curl_close($curl);
Explanation: In the above curl request we’ve to obtain the api token so that we can make further requests to api in order to get products, inventory and prices data
Curl Request: Get Products
  curl_setopt_array($curl, array(
  CURLOPT_URL => 'https://api.malfini.com/api/v4/product',
  CURLOPT_RETURNTRANSFER => true,
  CURLOPT_ENCODING => '',
  CURLOPT_MAXREDIRS => 10,
  CURLOPT_TIMEOUT => 0,
  CURLOPT_FOLLOWLOCATION => true,
  CURLOPT_HTTP_VERSION => CURL_HTTP_VERSION_1_1,
  CURLOPT_CUSTOMREQUEST => 'GET',
  CURLOPT_HTTPHEADER => array('Authorization: Bearer {token}),
  ));
  $response = curl_exec($curl);
  curl_close($curl);
Explanation: In the above curl request we can get the products and data by using the bearer token that we’ve already generated from api.
Curl Request: Get Stock/Inventory
  $curl = curl_init();
  curl_setopt_array($curl, array(
  CURLOPT_URL => 'https://api.malfini.com/api/v4/product/availabilities',
  CURLOPT_RETURNTRANSFER => true,
  CURLOPT_ENCODING => '',
  CURLOPT_MAXREDIRS => 10,
  CURLOPT_TIMEOUT => 0,
  CURLOPT_FOLLOWLOCATION => true,
  CURLOPT_HTTP_VERSION => CURL_HTTP_VERSION_1_1,
  CURLOPT_CUSTOMREQUEST => 'GET',
  CURLOPT_HTTPHEADER => array('Authorization: Bearer {token}),
  ));
  $response = curl_exec($curl);
  $httpcode = curl_getinfo($curl, CURLINFO_HTTP_CODE);
  curl_close($curl);
Explanation: In the above curl request we can get the malfini api stock/inventory data to update the products on site.
Curl Request: Get Prices from Malfini
  $resp_arry = array();
  $curl = curl_init();
  curl_setopt_array($curl, array(
  CURLOPT_URL => 'https://api.malfini.com/api/v4/product/prices',
  CURLOPT_RETURNTRANSFER => true,
  CURLOPT_ENCODING => '',
  CURLOPT_MAXREDIRS => 10,
  CURLOPT_TIMEOUT => 0,
  CURLOPT_FOLLOWLOCATION => true,
  CURLOPT_HTTP_VERSION => CURL_HTTP_VERSION_1_1,
  CURLOPT_CUSTOMREQUEST => 'GET',
  CURLOPT_HTTPHEADER => array('Authorization: Bearer {token}),
  ));
  $response = curl_exec($curl);
  $httpcode = curl_getinfo($curl, CURLINFO_HTTP_CODE);
  curl_close($curl);
Explanation: In the above curl request we can get the prices of products that we have imported on our site.
This concludes our overview of integrating multiple supplier APIs into WooCommerce. We’ve developed a custom plugin that seamlessly integrates product data, stock levels, and pricing from all three suppliers—Falk-Ross, UTTeam, and Malfini—into your WooCommerce store. If you’re interested in using this plugin or need a custom solution tailored to your specific requirements, feel free to contact us for more information and support.
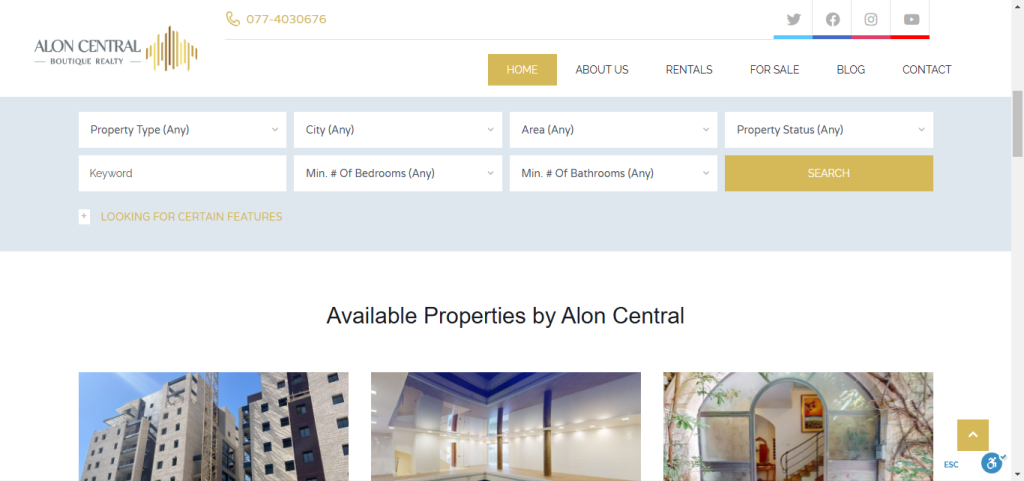
About aloncentral properties API:
AlonCentral provides an API that offers access to a wide range of property data, including vacation rentals, long-term rentals, and for-sale apartments—primarily focused on the Jerusalem area. The API enables third-party systems or websites to pull detailed property listings, availability, pricing, and location-specific data. AlonCentral combines this technology with a high level of personalized service, deep local expertise, and a passion for the city of Jerusalem, making it a reliable partner for real estate integrations and property management platforms.
We will use custom plugin to import the properties data from api with a curl request as under:
Curl Request:

$curl = curl_init();
curl_setopt_array($curl, array(
CURLOPT_URL => 'https://www.aloncentral.com/wp-json/api/v1/property',
CURLOPT_RETURNTRANSFER => true,
CURLOPT_ENCODING => '',
CURLOPT_MAXREDIRS => 10,
CURLOPT_TIMEOUT => 0,
CURLOPT_FOLLOWLOCATION => true,
CURLOPT_HTTP_VERSION => CURL_HTTP_VERSION_1_1,
CURLOPT_CUSTOMREQUEST => 'GET',
CURLOPT_HTTPHEADER => array(
 'Authorization: Basic {token here}'
 ),
));

$response = curl_exec($curl);
$httpcode = curl_getinfo($curl, CURLINFO_HTTP_CODE);
curl_close($curl);
To fetch property data from AlonCentral, you can use the following API endpoint:https://www.aloncentral.com/wp-json/api/v1/property
This endpoint returns property listings in JSON format, including key details such as property name, description, price, property type (rental, vacation, or for-sale), location, agent name, and other relevant metadata. This structured data can be used to display listings dynamically on external websites, integrate with real estate platforms, or sync with a custom property management solution.
Explanation:
By using the cURL request shown above, you’ll receive a JSON response containing detailed property data and metadata such as property name, description, price, property type, agent name, and more. We’ve implemented this integration using a custom plugin that connects the API with WordPress or other platforms. If you’d like more information about this solution or need help with a similar integration, feel free to contact us. Thank you!
In this blog, we’ll walk through the process of creating a custom plugin to import product data from the MSAN B2B API, specifically using the endpoint:https://b2b.msan.hr/B2BService/HTTP/Product/GetProductsList.aspx
This API returns product data in XML format and requires valid API credentials along with certificates for secure access. We’ll use a cURL request to fetch the data, parse the XML response, and import the products into a WooCommerce store. This integration ensures your product catalog remains up to date by automatically syncing from MSAN’s B2B service.
Curl Request:
  $ch = curl_init();
  curl_setopt($ch,CURLOPT_URL,"https://b2b.msan.hr/B2BService/HTTP/Product
  /GetProductsList.aspx");
  curl_setopt($ch, CURLOPT_VERBOSE, 1);
  curl_setopt($ch, CURLOPT_SSL_VERIFYPEER, 1);
  curl_setopt($ch, CURLOPT_CAINFO, "/path to/ca.pem");
  curl_setopt($ch, CURLOPT_SSLCERT, "/path to/client.pem");
  curl_setopt($ch, CURLOPT_SSLKEY, "/path to/key.pem");
  curl_setopt($ch, CURLOPT_SSLKEYPASSWD, "{keypswd}");
  curl_setopt ($ch, CURLOPT_HTTPHEADER, Array("Content-Type: text/xml"));
  curl_setopt($ch, CURLOPT_RETURNTRANSFER, 1);
  $response = curl_exec($ch);
  $httpcode = curl_getinfo($ch, CURLINFO_HTTP_CODE);
  curl_close($ch);
Get Price Curl Request:
In addition to fetching product details, the MSAN B2B API also provides a dedicated endpoint to retrieve updated product pricing. To get the latest prices, we use a similar cURL request as before, but with the following URL:https://b2b.msan.hr/B2BService/HTTP/Product/GetProductsPriceList.aspx
This request returns pricing information in XML format, including product codes and their corresponding current prices. It requires the same authentication credentials and certificate setup used in the product data request. This endpoint is essential for keeping your WooCommerce store’s pricing in sync with MSAN’s latest pricing updates.
Get product specifications Curl Request:
To retrieve additional product options or specifications, the MSAN B2B API provides another dedicated endpoint:https://b2b.msan.hr/B2BService/HTTP/Product/GetProductsSpecification.aspx
Using the same cURL request structure and authentication setup as the previous endpoints, this URL returns detailed specification data in XML format. The response typically includes technical attributes, extended descriptions, and other metadata that can be used to enrich product listings on your WooCommerce store. Incorporating this data helps provide more complete product information for customers, improving the overall shopping experience.
With the combination of these API endpoints—product list, price list, and product specifications—you can fully automate the import and update of products from the MSAN B2B service into your WooCommerce store. By using cURL requests and handling the XML responses properly, your store can stay up to date with the latest product details, pricing, and technical specifications. We’ve implemented this process through a custom WooCommerce plugin tailored for MSAN’s API. If you’re interested in using this plugin or need a custom solution for your store, feel free to contact us for more information or support.
In this blog, we’ll guide you through the process of integrating the Bilinfo Car Listings API (https://gw.bilinfo.net/listingapi/api) into a WordPress site using a custom post type. The goal is to fetch car listings via the API and map the returned metadata into custom meta fields using the Smart Custom Fields (SCF) plugin.
The Bilinfo API provides access to structured car data such as make, model, year, mileage, price, images, and more. We will connect to the API using cURL with Basic Authentication, using the provided Username and Password. You can find the official API documentation for further reference here:
https://developer.bilinfo.net/content/Bilinfo_XML_API.pdf
To retrieve the car listings data, we’ll use the following Bilinfo API endpoint:https://gw.bilinfo.net/listingapi/api/export
This endpoint returns structured vehicle listing data in XML format, including detailed information such as brand, model, registration year, price, mileage, fuel type, images, and more. The request must be made using cURL with Basic Authentication, supplying the Username and Password provided by Bilinfo. Once the data is retrieved, it can be parsed and imported into a custom post type in WordPress, with each field mapped to custom meta fields using the Smart Custom Fields (SCF) plugin.
Curl Request:
  $curl = curl_init();
  curl_setopt_array( $curl, array(
  CURLOPT_URL => 'https://gw.bilinfo.net/listingapi/api/export',
  CURLOPT_RETURNTRANSFER => true,
  CURLOPT_ENCODING => '',
  CURLOPT_MAXREDIRS => 10,
  CURLOPT_TIMEOUT => 0,
  CURLOPT_FOLLOWLOCATION => true,
  CURLOPT_HTTP_VERSION => CURL_HTTP_VERSION_1_1,
  CURLOPT_CUSTOMREQUEST => 'GET',
  CURLOPT_HTTPHEADER => array(
         'Authorization: Basic {authorization user|password}'
        ),
  ));
  $response = curl_exec($curl);
  $httpcode = curl_getinfo($curl, CURLINFO_HTTP_CODE);
  curl_close($curl);
  echo $response;
Explanation:
By using this integration method, you can automate the import of vehicle listings from the Bilinfo API into your WordPress website with complete control over how the data is displayed and managed. Leveraging custom post types along with the SCF (Smart Custom Fields) plugin ensures that each vehicle’s specifications—such as title, description, images, features, and pricing—are properly structured and easy to update.
If you’re looking for a custom-built plugin to handle this integration or need help implementing it on your site, feel free to contact us here or visit our Fiverr profile for assistance. We’ll be happy to help you streamline your listings management with a robust API solution.
Autoscout24 company?
AutoScout24 is Europe’s largest online automotive marketplace, providing a trusted platform for buying and selling vehicles across the continent. It serves a wide range of users including individual consumers, car dealerships, and business partners in the automotive, finance, and insurance industries. The platform features a comprehensive selection of listings—from used and new cars to motorcycles, caravans, and commercial vehicles. With its wide reach and robust digital infrastructure, AutoScout24 plays a central role in streamlining the online car trading experience across Europe.

API Integration:
We will use a simple curl request to integrate the api in our wordpress site as under:
Getting All listings response from api:
To retrieve all vehicle listings, we use the following API endpoint:https://www.autoscout24.ch/api/hci/v3/json/Vehicles/summaries?cuid={cuid}&member={member_id}&page=1&itemsperpage=1000&lng=de
In this request, you’ll need to replace {cuid} and {member_id} with your actual client user ID and member ID provided by AutoScout24. The API will return a JSON response containing a summary of up to 1000 vehicle listings per page, including key metadata such as vehicle ID, title, brand, model, price, mileage, and other essential details.
This endpoint is particularly useful for syncing AutoScout24 listings to an external system like a WordPress or WooCommerce-based car dealership site. Make sure to paginate through the results if you have more than 1000 listings by adjusting the page parameter.
$curl = curl_init();
curl_setopt_array($curl, array(
 CURLOPT_URL => 'https://www.autoscout24.ch/api/hci/v3/json/Vehicles/summaries?cuid={cuid here}&member={member id here}&page=1&itemsperpage=1000&lng=de',
 CURLOPT_RETURNTRANSFER => true,
 CURLOPT_ENCODING => '',
 CURLOPT_MAXREDIRS => 10,
 CURLOPT_TIMEOUT => 0,
 CURLOPT_FOLLOWLOCATION => true,
 CURLOPT_HTTP_VERSION => CURL_HTTP_VERSION_1_1,
 CURLOPT_CUSTOMREQUEST => 'GET',
));
$response = curl_exec($curl);
curl_close($curl);
Getting single auto listing data from API:
To retrieve detailed information for a specific vehicle, you can use the following AutoScout24 API endpoint:https://www.autoscout24.ch/api/hci/v3/json/Vehicles/{listing_id}?lng=de&member={member_id}&cuid={cuid}
Replace {listing_id} with the actual vehicle’s ID, and insert your assigned {member_id} and {cuid} (Client User ID). This API request returns a comprehensive JSON response containing all metadata related to that vehicle listing—including title, full description, price, mileage, fuel type, gearbox, engine power, color, images, and additional features or configurations.
This endpoint is particularly useful for populating detailed car pages on your website by importing the full listing content from AutoScout24.
  curl_setopt_array($curl, array(
  CURLOPT_URL => 'https://www.autoscout24.ch/api/hci/v3/json/Vehicles/{your list
  id}?lng=de&member={your memeber id}&cuid={your cuid here}',
  CURLOPT_RETURNTRANSFER => true,
  CURLOPT_ENCODING => '',
  CURLOPT_MAXREDIRS => 10,
  CURLOPT_TIMEOUT => 0,
  CURLOPT_FOLLOWLOCATION => true,
  CURLOPT_HTTP_VERSION => CURL_HTTP_VERSION_1_1,
  CURLOPT_CUSTOMREQUEST => 'GET',
  ));
  $response = curl_exec($curl);
  curl_close($curl);
Custom Plugin to Integrate & Sync API:
We’ve developed a fully functional custom WordPress plugin that seamlessly integrates with the AutoScout24 API. This plugin automatically imports vehicle listings into a custom post type, storing all relevant data into custom meta fields. It supports real-time synchronization—fetching new listings, updating existing ones based on changes from the API, and removing discontinued listings from your WordPress database.
This ensures your website always reflects the latest data available on AutoScout24 without manual intervention. If you’re interested in this plugin or need a custom solution for your own integration needs, feel free to contact us here for more details.
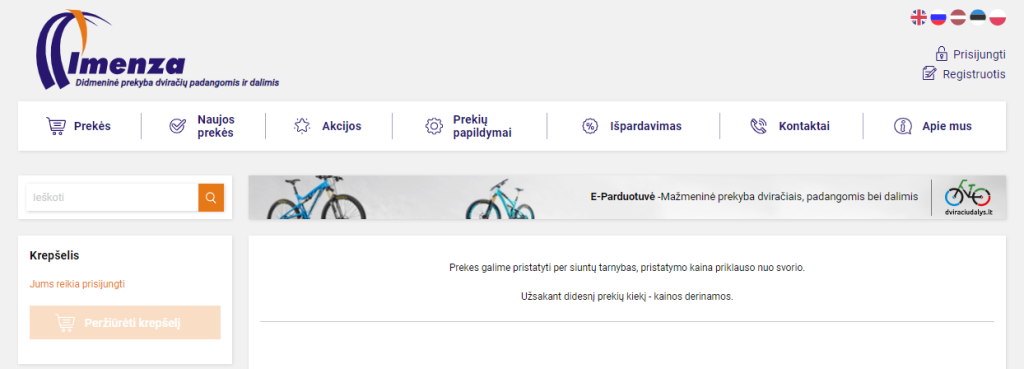
About Imenza API?
UAB Imenza is a Lithuanian-based wholesale distributor specializing in bicycle tires, inner tubes, parts, and accessories. Established in 1992, the company quickly expanded its operations and began direct cooperation with Taiwanese and Chinese manufacturers by 1998. Today, Imenza offers a catalog of over 9,600 products, ranging from complete bicycles to high-quality components and accessories—all available from their local warehouses for efficient delivery.
The Imenza API allows for seamless integration of their extensive product catalog into external platforms like eCommerce stores. This enables automated product import, inventory synchronization, and price updates—ideal for businesses looking to connect their systems directly with Imenza’s offerings.
For more details, you can visit their official site: https://www.imenza.lt/
After receiving a request from one of our clients to import and synchronize product data from the Imenza API, we developed a fully customized WordPress plugin tailored to their needs. This plugin is designed to integrate directly with a WooCommerce store, enabling automatic import of products—including titles, descriptions, images, and variations—as well as real-time synchronization of inventory levels and pricing.
The plugin ensures the WooCommerce store always reflects the latest product information from Imenza’s catalog without any manual effort. It supports scheduled API requests, mapping of product fields, and compatibility with variable products to handle sizes or types.
If you’re looking for a similar custom plugin or need help connecting your WooCommerce site with the Imenza API, feel free to contact us for more information.
here are the details of our work:
Getting all Products Curl Request:
To begin the integration, we first created a cURL request to fetch the complete list of products from the Imenza API. The API endpoint used for this operation is:
rubyCopyEdithttps://www.imenza.lt/api/products/total
This request returns the total product data available from Imenza, including essential product information such as SKU, name, description, categories, and other attributes. The response is typically in JSON format and serves as the foundational data needed for importing products into the WooCommerce store.
  $curl = curl_init();
  curl_setopt_array($curl, array(
  CURLOPT_URL => 'https://www.imenza.lt/api/products/total',
  CURLOPT_RETURNTRANSFER => true,
  CURLOPT_ENCODING => '',
  CURLOPT_MAXREDIRS => 10,
  CURLOPT_TIMEOUT => 0,
  CURLOPT_FOLLOWLOCATION => true,
  CURLOPT_HTTP_VERSION => CURL_HTTP_VERSION_1_1,
  CURLOPT_CUSTOMREQUEST => 'GET',
  CURLOPT_HTTPHEADER => array( 'Authorization: {your auth token}' )
  ));

  $response = curl_exec($curl);
  curl_close($curl);
Explanation:
This endpoint requires a GET request method to retrieve the complete products data—including product details, metadata, image URLs, prices, and stock levels—in JSON format.
To successfully access this data, it is mandatory to include an authorization token in the request header. This token must be obtained from your Imenza account, typically provided by the Imenza team upon registration or account activation.
Important:
If you attempt to send a request without the authorization token, the API will reject your request and return an error message such as "Unauthorized" or "Forbidden". Ensure that every API call includes the proper token in the headers to establish valid and secure communication with the Imenza API.
Getting Categories Tree from API:
  $page = 1,2,3...etc

  $curl = curl_init();
  curl_setopt_array($curl, array(
  CURLOPT_URL => "https://www.imenza.lt/et/api/products/?
  client=1&page=$page&categoriestree=1&items=500",
  CURLOPT_RETURNTRANSFER => true,
  CURLOPT_ENCODING => '',
  CURLOPT_MAXREDIRS => 10,
  CURLOPT_TIMEOUT => 0,
  CURLOPT_FOLLOWLOCATION => true,
  CURLOPT_HTTP_VERSION => CURL_HTTP_VERSION_1_1,
  CURLOPT_CUSTOMREQUEST => 'GET',
  CURLOPT_HTTPHEADER => array( 'Authorization: Auth Token here' ),
  ));

  $response = curl_exec($curl);
  curl_close($curl);
Explanation:
This request will return a structured list of all product categories available in the Imenza system. It includes main categories and their nested subcategories, which helps in organizing and mapping products accurately on your WooCommerce store.
client=1: Identifies the API client.page=$page: Supports pagination to fetch results in multiple pages.categoriestree=1: Enables the category tree structure in the response.items=500: Defines the number of items to fetch per page (up to 500 products per request).
As with other API requests, you must include your authorization token in the request headers to successfully receive data. Without it, the request will fail due to insufficient permissions.
This endpoint is useful when syncing or mapping product categories from Imenza to your WooCommerce taxonomy structure.
Sync data between API and Woo Store:
To ensure seamless integration and synchronization between the Imenza API and your WooCommerce store, we’ve developed a custom WordPress plugin that automates the process of importing, updating, and syncing product data directly from the supplier’s warehouse to your website.
Our custom plugin ensures:
Automated Scheduled Updates to fetch new data and update existing listings without manual intervention
Secure API Authorization & Integration
Real-Time Import & Sync of Product Data (Inventory, Stock, Prices, Images, etc.)
What is Avochato?
Avochato is a communication platform designed for teams in sales, support, healthcare, and operations. It offers a shared inbox and dedicated phone numbers, enabling teams to send and receive text messages and calls with customers in real-time. By centralizing communication into a collaborative workspace, Avochato enhances both internal team coordination and external customer engagement, making client communication seamless, responsive, and efficient.
Contact Form 7 used for?
Contact Form 7 is a popular WordPress plugin that allows you to easily add contact forms to your website. It provides a simple way for your visitors or clients to get in touch with you directly through your site. Beyond basic communication, it’s also a great tool for collecting leads and email addresses, helping you grow your email list and stay connected with potential customers.
Contact form 7 extension for Avochato
We’ve previously done extensive work integrating Contact Form 7 with Avochato using PHP, leading to the development of our custom Contact Form 7 extension for Avochato. So, we thought—why not share some of our working and well-prepared code examples with you? This integration allows you to automatically send form submissions from your website directly to Avochato, enabling real-time communication and better lead management.
In this post we will use PHP and cURL to connect Contact Form 7 with Acochato.
  // Request Method to use in the script
  function apifixer_remoteDATA($url, $data = false){
     $ch = curl_init();
     curl_setopt($ch, CURLOPT_URL, $url);
     //If receives Data than POST else GET
     if ($data){
       curl_setopt($ch, CURLOPT_POST, true);
       curl_setopt($ch, CURLOPT_POSTFIELDS, $data);
       curl_setopt($ch, CURLOPT_USERAGENT, "Mozilla/4.0
       (compatible; MSIE 8.0; Windows NT 6.0)");
       curl_setopt($ch, CURLOPT_HTTPHEADER, array(
       'Content-Type: application/json'));
       curl_setopt($ch, CURLOPT_HEADER, false);
       curl_setopt($ch, CURLOPT_NOBODY, false);
      }
      curl_setopt($ch, CURLOPT_RETURNTRANSFER, 1);
      curl_setopt($ch, CURLOPT_SSL_VERIFYHOST, false);
      curl_setopt($ch, CURLOPT_SSL_VERIFYPEER, false);
      curl_setopt($ch, CURLOPT_MAXREDIRS, 10);
      curl_setopt($ch, CURLOPT_FOLLOWLOCATION, 1);
      curl_setopt($ch, CURLOPT_CONNECTTIMEOUT, 50);
      $data = curl_exec($ch);
      curl_close($ch);
      return $data;
   }
   // Trigger the script on CONTACT FORM 7 Mail Sent
   add_action('wpcf7_mail_sent', 'apifixer_avochato', 10, 1);
   function apifixer_avochato($contact_form){
      $data = array();
      // Add your Avochato credentials below
      $data['auth_id'] = 'your Auth ID';
      $data['auth_secret'] = 'Your Auth Secret';
      //Change your contact form 7 id here
      $_contact_form_7_id = '1951';
      //to get form id when form is posted
      $form_id = $contact_form->id();
      //to get posted data in associative array
      $submission = WPVF7_Submission::get_instance();
      $posted_data = $submission->get_posted_data();
      //urls to link avochato
      $url_contacts = "https://www.avochato.com/v1/contacts";  //url to add contact
      in avochato
      $url_messages = "https://www.avochato.com/v1/messages";  //url to send message
      using avochato
      //matches the contact form id with posted form id
      if ($form_id == $_contact_form_7_id){
      //you can write your message to be sent using Avochato
      $posted_data['message'] = 'Hey ' .  $posted_data['your-name'] . ',
      Thanks for contacting apifixer.com Your wholesale quote for
      '.$posted_data['qty'] . ' ' . $posted_data['towel'] . '
      will be coming to you shortly!';
      $data['phone'] = $posted_data['your-phone'];
      //Send Text Message using Avocahto
      if ($data['phone']){
         apifixer_remoteDATA($url_messages, json_encode($data));
      }
      $data['name']     = $posted_data['your-name'];
      $data['email']    = $posted_data['your-email'];
      $data['company']  = $posted_data['your-company'];
      $data['towel']    = $posted_data['towel'];
      $data['quantity'] = $posted_data['qty'];
      $data['delivery'] = $posted_data['delivery'];
      //Add a Contact in Avocahto
      apifixer_remoteDATA($url_contacts, json_encode($data));
    }
  }
Explanation:
This code provides a complete integration between Contact Form 7 and the Avochato communication platform by using WordPress hooks and the Avochato API. The custom function apifixer_remoteDATA() is a utility that abstracts the logic for sending API requests via cURL. It dynamically switches between GET and POST methods depending on whether data is passed to it, and it’s configured with common headers and cURL options to support JSON data transmission securely and efficiently.
The second part of the script uses the wpcf7_mail_sent action hook to trigger custom functionality after a Contact Form 7 submission. It checks whether the form ID matches a specific form (ID 1951 in this case). When matched, it pulls the submitted data using WPCF7_Submission::get_instance() and prepares two API requests to Avochato:
- Sending a personalized SMS message to the user using the
messagesendpoint. The message thanks the user and confirms receipt of their wholesale quote inquiry. - Adding or updating a contact in the Avochato contact list using the
contactsendpoint, which includes their name, email, phone number, company name, product details, quantity, and delivery date.
This integration ensures that leads or inquiries submitted via Contact Form 7 are immediately acknowledged through SMS, while also syncing their contact details into Avochato’s CRM system. It’s highly useful for businesses looking to streamline communication, improve response times, and manage customer interactions in one unified workflow.
With minimal modification (such as updating form ID, Avochato credentials, and field names), this code can be customized to work with other forms and use cases where instant messaging and contact syncing are required.
In conclusion, this integration bridges Contact Form 7 with Avochato, allowing automatic contact creation and real-time message sending whenever a form is submitted on your website. It’s a powerful way to enhance customer engagement, streamline communication, and ensure no lead goes unanswered. If you’d like help setting this up or want a custom plugin for your own use case, feel free to reach out.
Mailchimp used for?
Mailchimp is an all-in-one marketing platform designed to help businesses manage and communicate with their audience effectively. It offers tools for:
- Email marketing campaigns
- Audience segmentation
- Automation workflows
- Landing pages and forms
- Analytics and reporting
Its user-friendly interface and powerful features make it a popular choice for both beginners and experienced marketers. By using Mailchimp, businesses can build lasting customer relationships, track campaign performance, and drive engagement — all from one central platform.
Contact Form 7 used for?
Contact Form 7 on your website provides an easy and secure way for visitors to send queries, complaints, suggestions, or feedback. It supports managing multiple forms and allows full customization of each form’s layout and content using simple HTML markup.
Additionally, Contact Form 7 supports features like:
- AJAX-powered form submission
- CAPTCHA integration
- Spam filtering
- Custom validation messages
This makes it a powerful yet lightweight solution for adding forms to your WordPress site without requiring complex setup.
Why do you need to integrate Contact Form 7 With MailChimp?
Integrating Contact Form 7 with Mailchimp helps streamline your marketing efforts by automatically sending form submissions directly to your Mailchimp email lists. Here’s why it’s beneficial:
- Automated Contact Collection: No more manually adding leads—form submissions go straight to your Mailchimp audience.
- Efficient Tagging: Automatically label and segment contacts for better targeting in campaigns.
- Seamless Campaign Integration: Instantly enroll new contacts into email automation workflows like welcome series or drip campaigns.
- Full Customization: Easily style the form to match your website’s design and branding.
- Flexible Placement: Use shortcodes to place the form anywhere on your site—landing pages, sidebars, or footers.
- Custom Fields Supported: Send any kind of data—names, emails, preferences—directly into Mailchimp for advanced segmentation.
This integration bridges the gap between user interaction and marketing automation, making your lead generation smarter and more efficient.
Key Features:
- Unlimited Contact Forms: Create and manage as many forms as needed across your website.
- Customizable Fields: Tailor form fields to collect exactly the data you need for your Mailchimp audience.
- Unique Mailchimp API Key per Form: Assign different API keys to individual forms for advanced list management or client-specific setups.
- Dedicated Mailing Lists: Link each contact form to a specific Mailchimp list for targeted data collection.
- Opt-in Checkbox Support: Give users the choice to subscribe or not by adding an opt-in checkbox to your forms.
- Single Opt-in Option: Instantly adds subscribers to your Mailchimp list without a confirmation email—ideal for faster signups.
- Double Opt-in Option: Sends a confirmation email to ensure the user consents to join your list—great for GDPR compliance and list quality.
- These features provide flexibility, control, and compliance, making the integration both powerful and user-friendly.
Premium Features:
- Unlimited Mailchimp List Subscribers: No restriction on the number of contacts you can send from your forms to your Mailchimp lists.
- Mailchimp Email Verification: Automatically validate email addresses before adding them to your list to ensure accuracy and reduce bounce rates.
- Unlimited Mailchimp Custom Fields: Map and send unlimited custom fields from your form to corresponding fields in Mailchimp for more personalized campaigns.
- Unlimited Mailchimp Tags and Groups: Organize subscribers efficiently by adding unlimited tags and assigning them to Mailchimp interest groups directly from your form submissions.
- These premium features enhance your email marketing automation and list segmentation, allowing for more precise targeting and better campaign performance.

Getting Started:
Here you find a notice above on the screen �?To use PSILO | Contact Form 7 Mailchimp Extension, Please install/activate Contact Form 7 plugin First!�? as shown in the image below:

after installing and activating the Contact Form 7 plugin you can activate the PSILO | Contact Form 7 Mailchimp Extension.
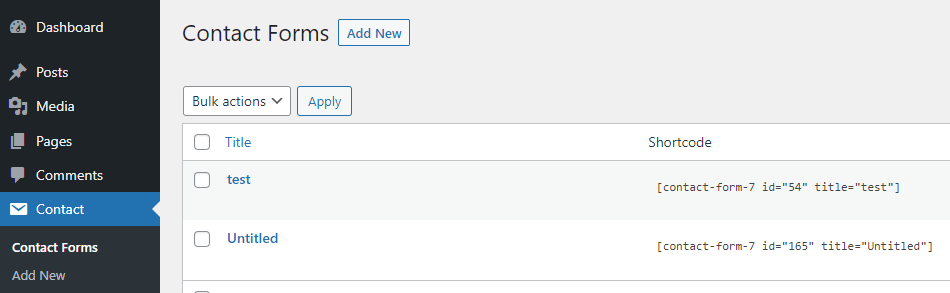
3-On the left side on wordpress menu bar, go to the Contact tab where you can create a new contact form, by clicking on Add New you can add a new form as shown in the image below:
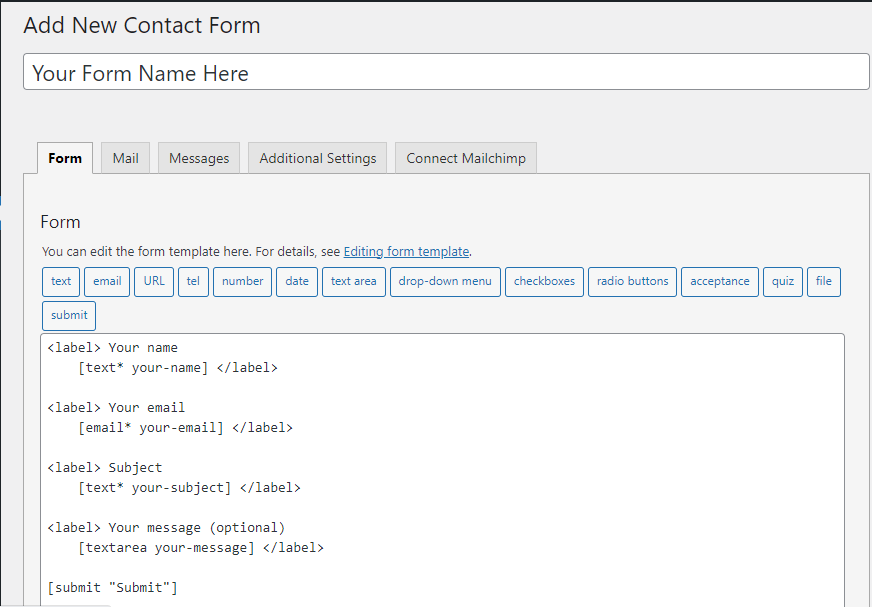
4-On creating new form you find here 5 different menu tabs:
In the Form tab, You can edit the form template of your contact form in the Form tab panel. HTML and Contact Form 7’s form-tags can be used in a form template.
A form-tag works as a placeholder for an HTML form control (e.g. a text input field) or a set of form controls (e.g. a group of checkboxes). Form-tags are replaced with HTML when rendering the form.
A form-tag must follow specific syntax rules. Otherwise, the form-tag won’t work correctly. Still, it is not necessary to remember the syntax because you can use the tag-generator tools to generate correct form-tags.
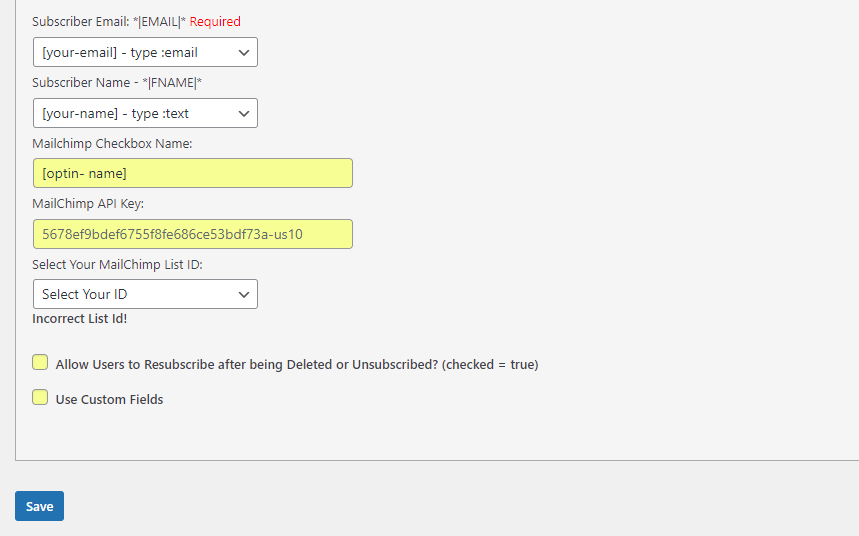
5-In the Connect Mailchimp tab, here is our mailchimp extension menu fields where you can set your field values like Subscriber Email that is required by Mailchimp and Subscriber Name where you can select your custom field from dropdown list that you want to post to Mailchimp API with your Subscriber Email field, after that you can add a checkbox custom name with description by simply adding input field checkbox in Form Tab and text description you want to add in checkbox label.
6-Then you have to insert your Mailchimp API key in the API key text field, you can get your API key from your Mailchimp account:
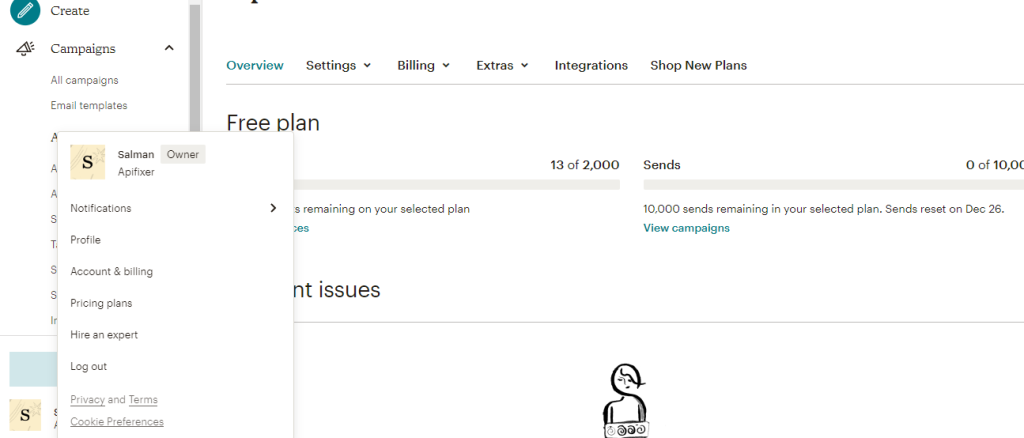
Go Inside your MailChimp account, click on your name from the bottom left side of the screen and click on your Account, After clicking on your account logo select Account & Billing as shown in the image below:
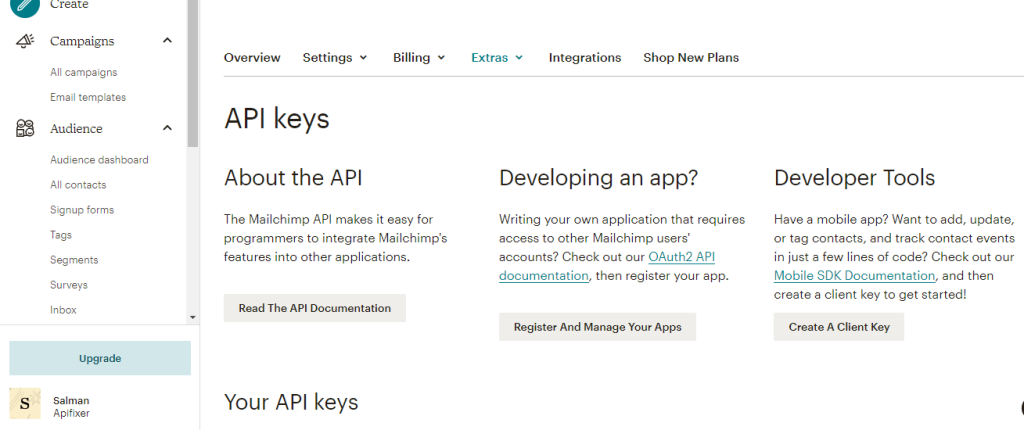
There you have to select Extras, where you can find the API key section like the image below:
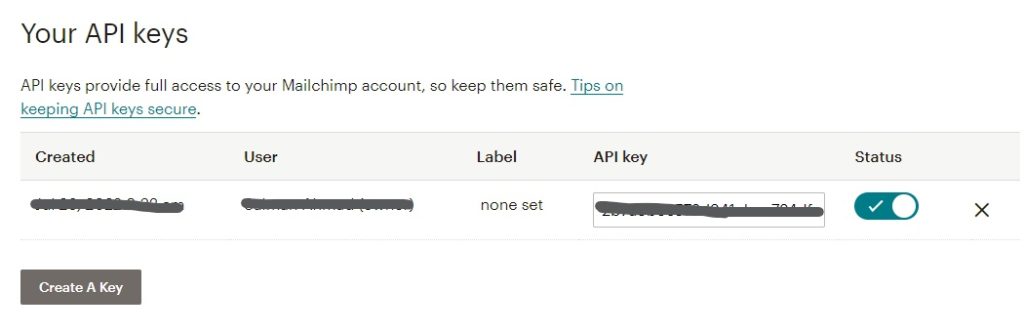
After finding the API key section you can Create Your API keys as shown in the image below and then you have to copy this API key that you want to use in the extension API Key field:
7-The next step after copying the API key from your Mailchimp account and pasting it to ‘MailChimp API Key:’ field in the extension, Click the save button to save your API Key and validate if your entered API key is correct or not, if your API key is valid it will show a drop down list of your all Lists/Audiences Names that you have created in your Mailchimp account to save your subscribers details, if the entered API key is not valid it will show an error message “API key is not valid�?.
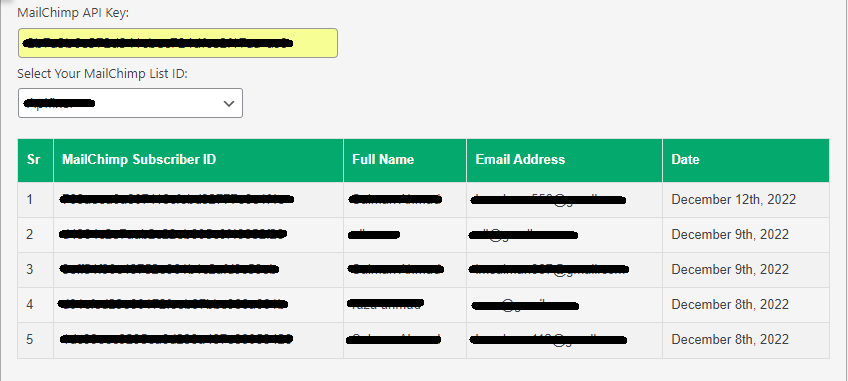
8-After selecting your Audience name from List dropdown click on the save button now you can see the Subscribers table of your Mailchimp Audience as shown in the image below:
9-In the next, here you can see two checkboxes, in the first checkbox this extension allows you to “Allow Users to Resubscribe after being Deleted or Unsubscribed?�?
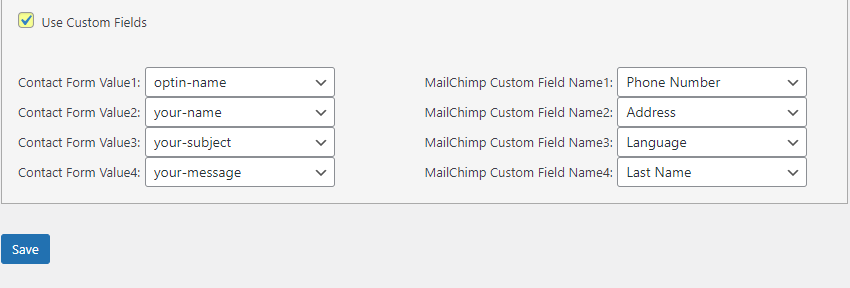
While in the second checkbox we’ve added an option to use custom fields to post to Mailchimp API from Contact Form 7. After checking this checkbox and saving the form you will see multiple dropdown lists, on the left side you can see Custom Fields of Contact Form 7 and on the right side you can see the Custom Fields of your mailchimp account.
Here you can select your custom form fields of contact form and map it to the custom fields of Mailchimp as shown in the image below when a user subscribe using contact form 7 filling out these form fields, these will map to mailchimp and save user data in by using these fields in your mailchimp audience lists.
We hope you’ve gained a clear understanding of the Contact Form 7 extension and how it integrates with Mailchimp. If you have any queries, need assistance, or want us to build a custom extension for your site—feel free to contact us anytime!