
Mailchimp used for?
Mailchimp is an all-in-one marketing platform designed to help businesses manage and communicate with their audience effectively. It offers tools for:
- Email marketing campaigns
- Audience segmentation
- Automation workflows
- Landing pages and forms
- Analytics and reporting
Its user-friendly interface and powerful features make it a popular choice for both beginners and experienced marketers. By using Mailchimp, businesses can build lasting customer relationships, track campaign performance, and drive engagement — all from one central platform.
Contact Form 7 used for?
Contact Form 7 on your website provides an easy and secure way for visitors to send queries, complaints, suggestions, or feedback. It supports managing multiple forms and allows full customization of each form’s layout and content using simple HTML markup.
Additionally, Contact Form 7 supports features like:
- AJAX-powered form submission
- CAPTCHA integration
- Spam filtering
- Custom validation messages
This makes it a powerful yet lightweight solution for adding forms to your WordPress site without requiring complex setup.
Why do you need to integrate Contact Form 7 With MailChimp?
Integrating Contact Form 7 with Mailchimp helps streamline your marketing efforts by automatically sending form submissions directly to your Mailchimp email lists. Here’s why it’s beneficial:
- Automated Contact Collection: No more manually adding leads—form submissions go straight to your Mailchimp audience.
- Efficient Tagging: Automatically label and segment contacts for better targeting in campaigns.
- Seamless Campaign Integration: Instantly enroll new contacts into email automation workflows like welcome series or drip campaigns.
- Full Customization: Easily style the form to match your website’s design and branding.
- Flexible Placement: Use shortcodes to place the form anywhere on your site—landing pages, sidebars, or footers.
- Custom Fields Supported: Send any kind of data—names, emails, preferences—directly into Mailchimp for advanced segmentation.
This integration bridges the gap between user interaction and marketing automation, making your lead generation smarter and more efficient.
Key Features:
- Unlimited Contact Forms: Create and manage as many forms as needed across your website.
- Customizable Fields: Tailor form fields to collect exactly the data you need for your Mailchimp audience.
- Unique Mailchimp API Key per Form: Assign different API keys to individual forms for advanced list management or client-specific setups.
- Dedicated Mailing Lists: Link each contact form to a specific Mailchimp list for targeted data collection.
- Opt-in Checkbox Support: Give users the choice to subscribe or not by adding an opt-in checkbox to your forms.
- Single Opt-in Option: Instantly adds subscribers to your Mailchimp list without a confirmation email—ideal for faster signups.
- Double Opt-in Option: Sends a confirmation email to ensure the user consents to join your list—great for GDPR compliance and list quality.
- These features provide flexibility, control, and compliance, making the integration both powerful and user-friendly.
Premium Features:
- Unlimited Mailchimp List Subscribers: No restriction on the number of contacts you can send from your forms to your Mailchimp lists.
- Mailchimp Email Verification: Automatically validate email addresses before adding them to your list to ensure accuracy and reduce bounce rates.
- Unlimited Mailchimp Custom Fields: Map and send unlimited custom fields from your form to corresponding fields in Mailchimp for more personalized campaigns.
- Unlimited Mailchimp Tags and Groups: Organize subscribers efficiently by adding unlimited tags and assigning them to Mailchimp interest groups directly from your form submissions.
- These premium features enhance your email marketing automation and list segmentation, allowing for more precise targeting and better campaign performance.

Getting Started:
Here you find a notice above on the screen �?To use PSILO | Contact Form 7 Mailchimp Extension, Please install/activate Contact Form 7 plugin First!�? as shown in the image below:

after installing and activating the Contact Form 7 plugin you can activate the PSILO | Contact Form 7 Mailchimp Extension.
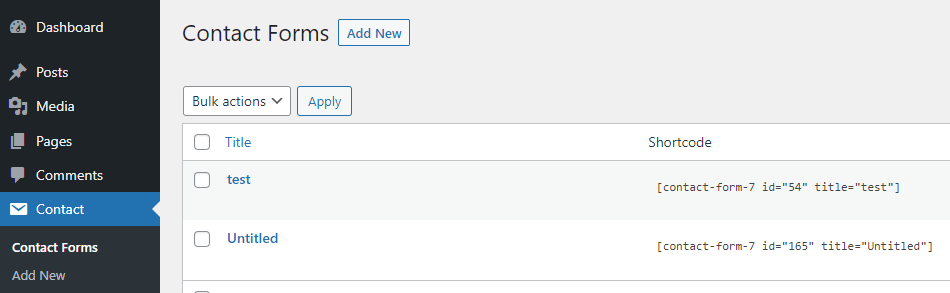
3-On the left side on wordpress menu bar, go to the Contact tab where you can create a new contact form, by clicking on Add New you can add a new form as shown in the image below:
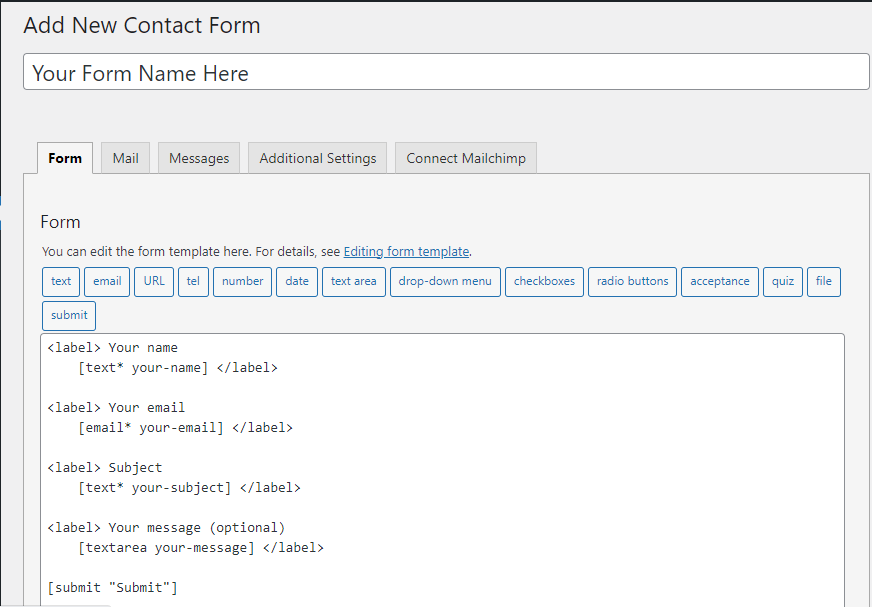
4-On creating new form you find here 5 different menu tabs:
In the Form tab, You can edit the form template of your contact form in the Form tab panel. HTML and Contact Form 7’s form-tags can be used in a form template.
A form-tag works as a placeholder for an HTML form control (e.g. a text input field) or a set of form controls (e.g. a group of checkboxes). Form-tags are replaced with HTML when rendering the form.
A form-tag must follow specific syntax rules. Otherwise, the form-tag won’t work correctly. Still, it is not necessary to remember the syntax because you can use the tag-generator tools to generate correct form-tags.
5-In the Connect Mailchimp tab, here is our mailchimp extension menu fields where you can set your field values like Subscriber Email that is required by Mailchimp and Subscriber Name where you can select your custom field from dropdown list that you want to post to Mailchimp API with your Subscriber Email field, after that you can add a checkbox custom name with description by simply adding input field checkbox in Form Tab and text description you want to add in checkbox label.
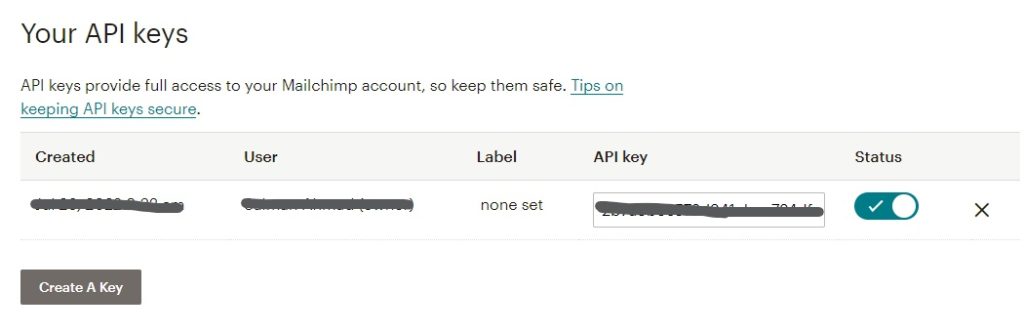
6-Then you have to insert your Mailchimp API key in the API key text field, you can get your API key from your Mailchimp account:
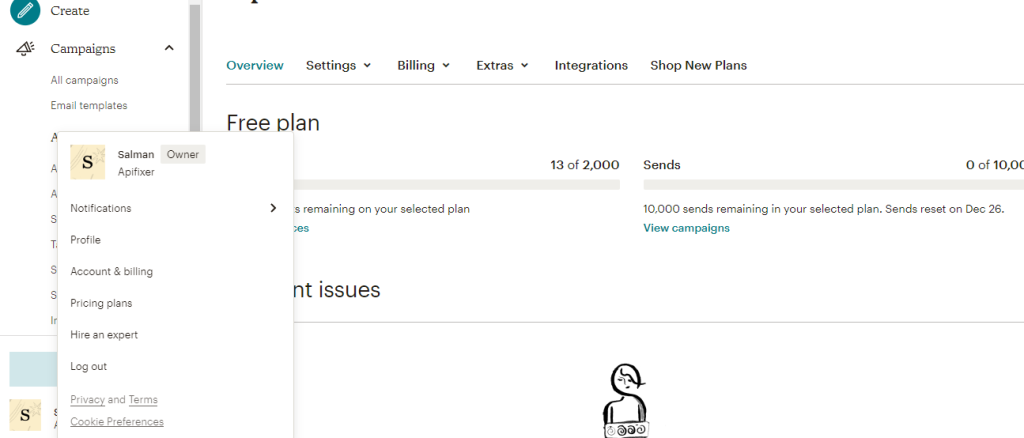
Go Inside your MailChimp account, click on your name from the bottom left side of the screen and click on your Account, After clicking on your account logo select Account & Billing as shown in the image below:
There you have to select Extras, where you can find the API key section like the image below:
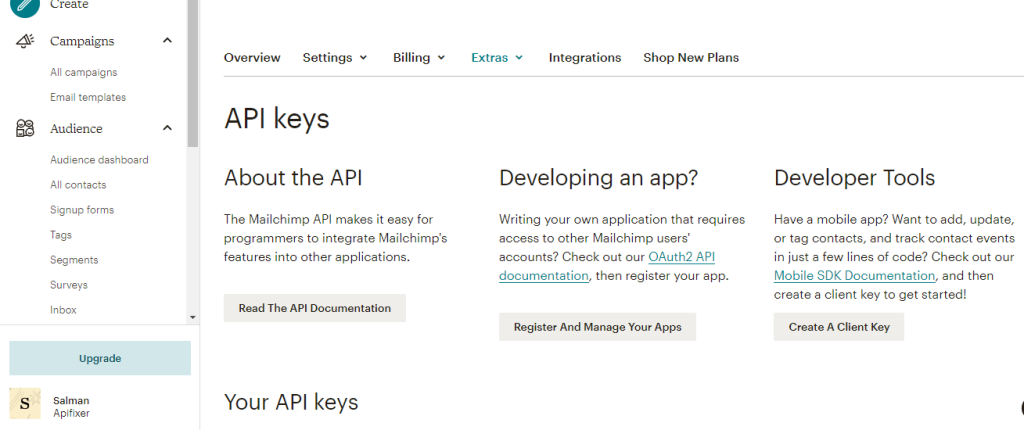
After finding the API key section you can Create Your API keys as shown in the image below and then you have to copy this API key that you want to use in the extension API Key field:
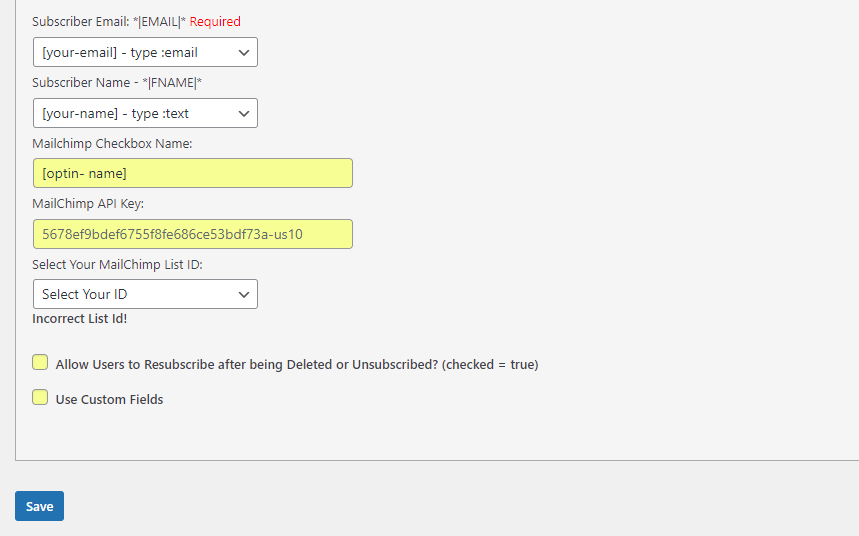
7-The next step after copying the API key from your Mailchimp account and pasting it to ‘MailChimp API Key:’ field in the extension, Click the save button to save your API Key and validate if your entered API key is correct or not, if your API key is valid it will show a drop down list of your all Lists/Audiences Names that you have created in your Mailchimp account to save your subscribers details, if the entered API key is not valid it will show an error message “API key is not valid�?.
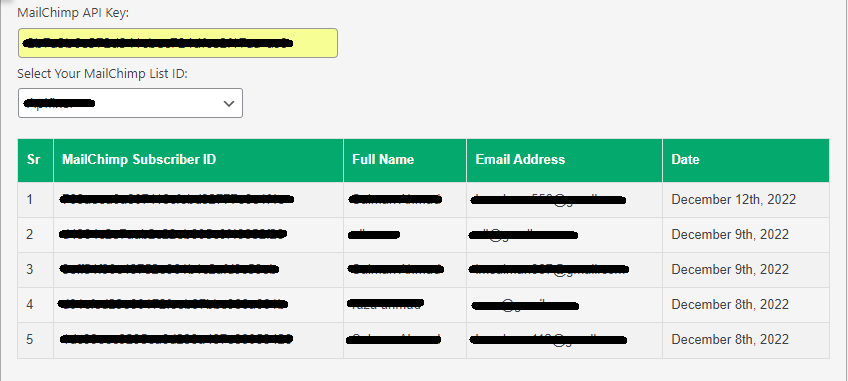
8-After selecting your Audience name from List dropdown click on the save button now you can see the Subscribers table of your Mailchimp Audience as shown in the image below:
9-In the next, here you can see two checkboxes, in the first checkbox this extension allows you to “Allow Users to Resubscribe after being Deleted or Unsubscribed?�?
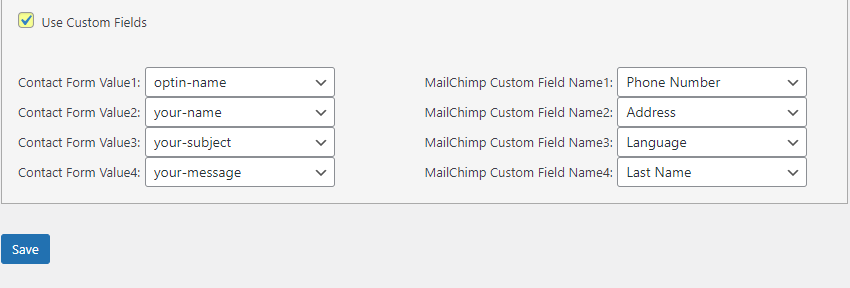
While in the second checkbox we’ve added an option to use custom fields to post to Mailchimp API from Contact Form 7. After checking this checkbox and saving the form you will see multiple dropdown lists, on the left side you can see Custom Fields of Contact Form 7 and on the right side you can see the Custom Fields of your mailchimp account.
Here you can select your custom form fields of contact form and map it to the custom fields of Mailchimp as shown in the image below when a user subscribe using contact form 7 filling out these form fields, these will map to mailchimp and save user data in by using these fields in your mailchimp audience lists.
We hope you’ve gained a clear understanding of the Contact Form 7 extension and how it integrates with Mailchimp. If you have any queries, need assistance, or want us to build a custom extension for your site—feel free to contact us anytime!